Every picture below is a screenshot of the add-on itself, taken with a real session loaded. Each control carries a number 1; the list beside it says what that control does and what it is set to out of the box. Point at a list item or a number to outline the control in the picture.
- RecordOpen the SceneCast tab and press Start Recording.
- ModelWork as usual. Every settled edit, selection change and camera move becomes a step.
- StopPress Stop Recording. Pro writes notes for what you did.
- ReviewScrub or play it back in Playback; set Hold and View.
- AnnotatePro: add or reword notes and chapters, key the camera, set the branding.
- ExportPick a size and press Export Session, or render in the background.
Where SceneCast lives
FreeProSceneCast records a modeling session in Blender and plays it back as a smooth, scrubbable timeline you can export as a video. All of it is in one place: the SceneCast tab of the 3D viewport's sidebar (press N). Requires Blender 4.2 or newer.
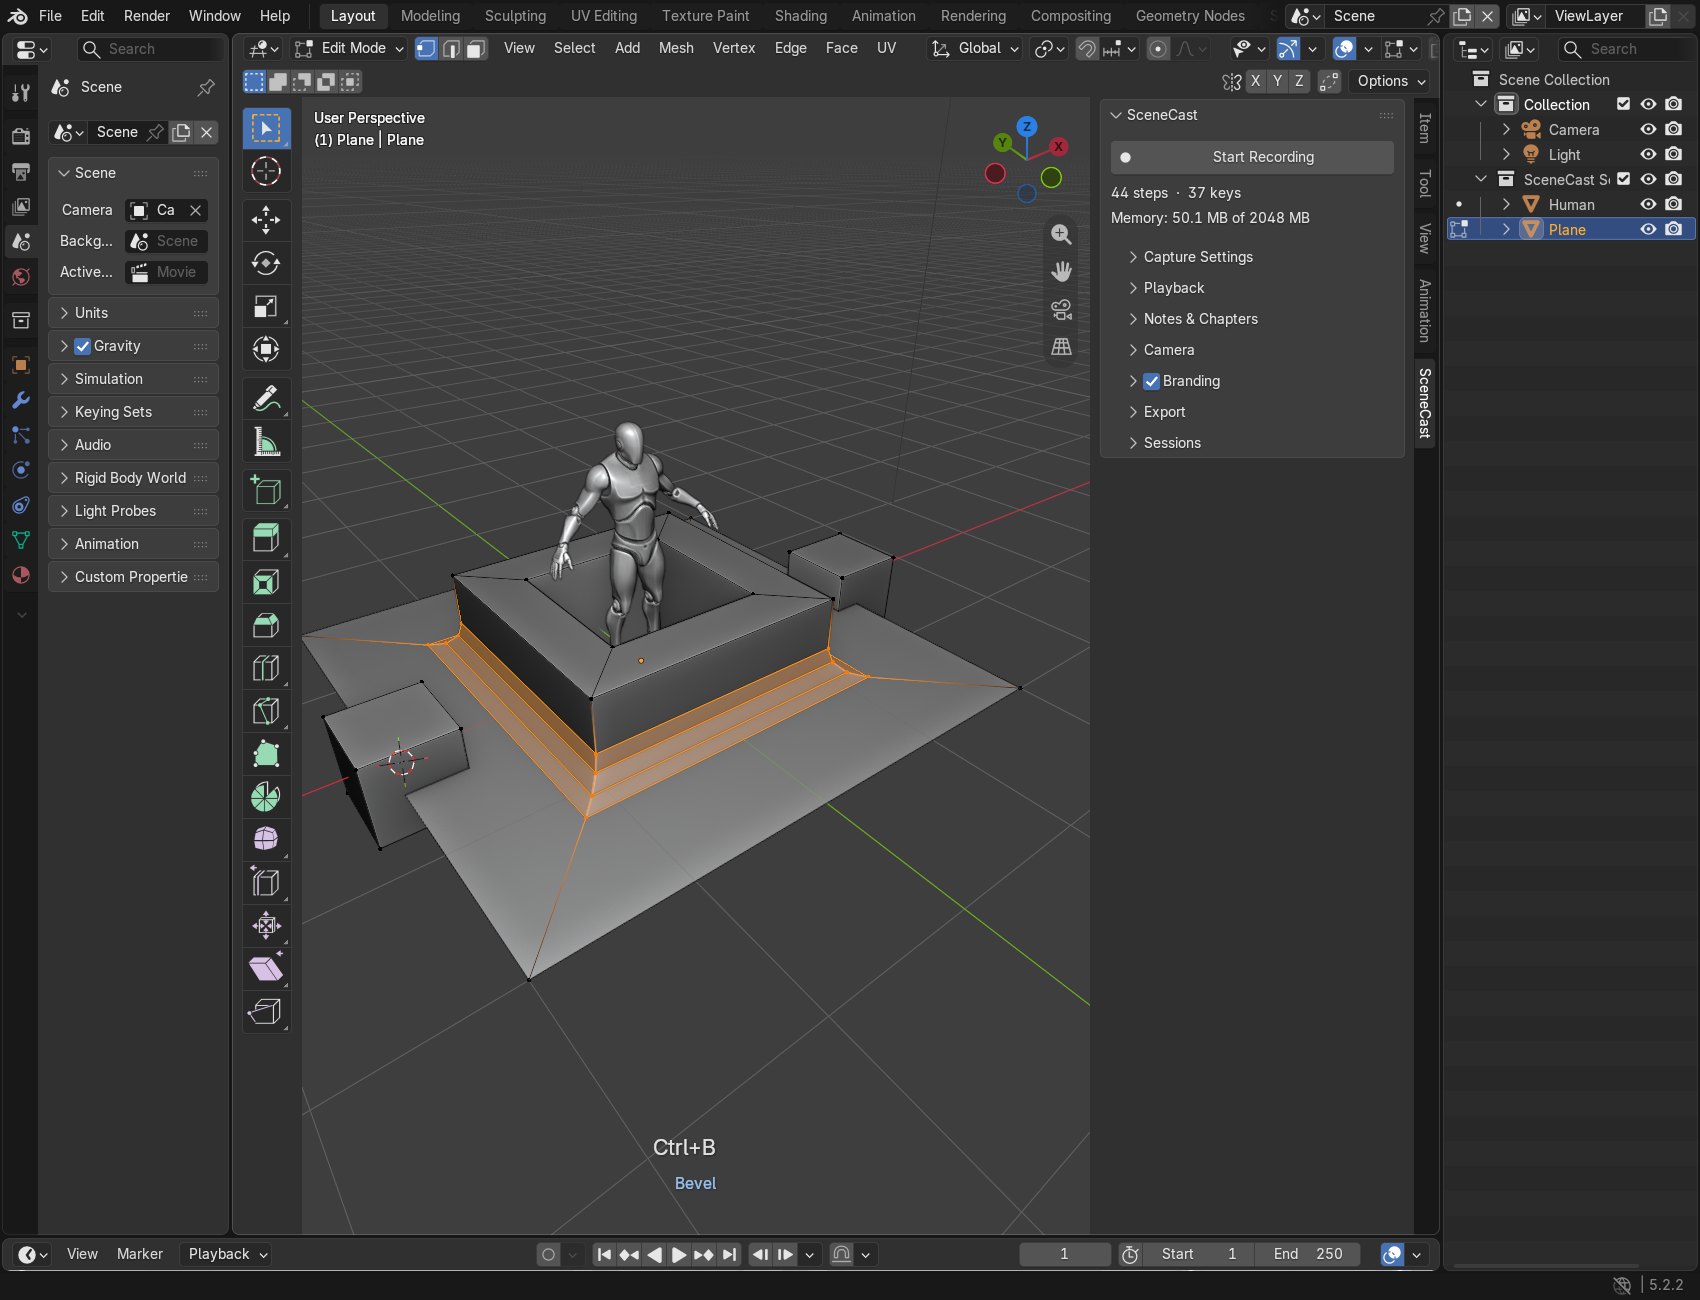
- 1
SceneCast tab
The add-on lives in the 3D viewport's sidebar. Press N over the viewport to show or hide the sidebar, then click the SceneCast tab on its edge.
- 2
SceneCast panel
One panel, with its sections folded inside it in the order you work: record, capture settings, playback, annotate, frame, brand, export, keep.
- 3
Start Recording
The one button you need to begin. Everything else can wait until you have a take.
- 4
Sections
Click a section's name to open it. Branding, Director Camera and Punch In have their on/off checkbox right on the header.
- 5
Keystrokes in the viewport
While you play a session back, the keys pressed at each step appear at the bottom of the viewport...
- 6
Operator name
...with the tool that made the step's change written under them in blue.
- 7
SceneCast Session collection
Recorded objects are gathered here while you record (see Capture Settings), and put back where they were when you clear the session.
Record
FreeProThe top of the panel. Start a take, watch it grow, stop it.
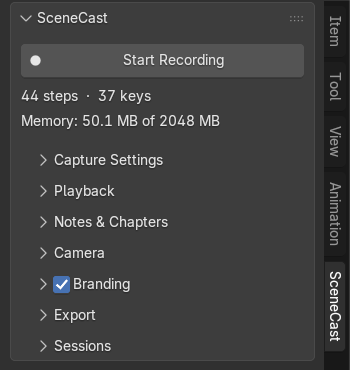
- 1
Start Recording
Starts a take. SceneCast captures a step each time an edit settles: the geometry of every visible mesh, transforms, selection, 3D cursor, pivot, the view, the modifier stack and the keys you pressed. Click again to stop.
- 2
Status
Steps and keystrokes captured, and under them the memory the session holds against your Memory Limit. The memory line turns into a warning at three quarters of the limit.
- 3
Sections
Playback and Export only appear once something is recorded. Pro adds Notes & Chapters, Camera, Branding and Sessions.
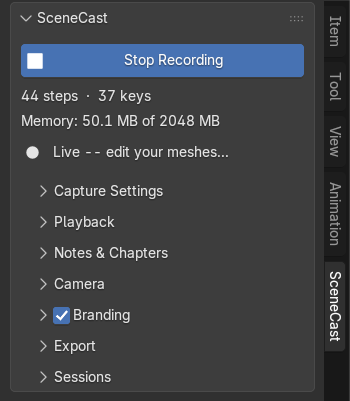
- 1
Stop Recording
Shown, highlighted, while a take is running. Stopping keeps every step captured so far.
- 2
Live
Recording is on: edit your meshes as usual. If the session reaches the Memory Limit, recording stops by itself and a red box here says why.
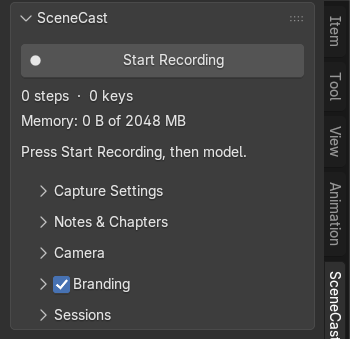
- 1
First run
Before the first take there is nothing to play or export, so only Record and the setup sections show.
Capture Settings
FreeProWhat a take records. Folded by default, and locked while recording, because changing it halfway would leave the session half one way and half the other.
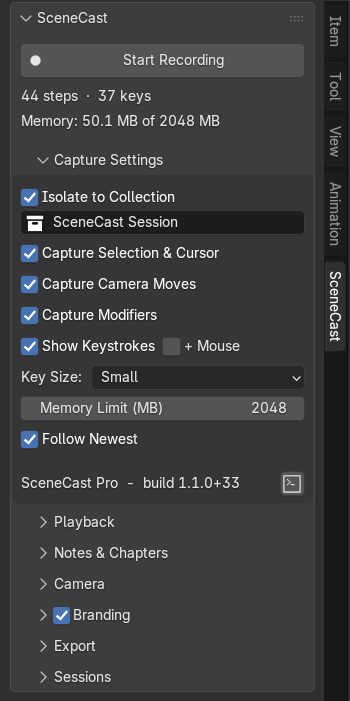
- 1
Isolate to CollectionDefault: On
When you press Record, gather every recorded object into its own collection, so the session is tidy in the Outliner. Clear Session puts each object back in its original collection.
- 2
Collection nameDefault: SceneCast Session
The name of that collection.
- 3
Capture Selection & CursorDefault: On
Record changes to the selection, the 3D cursor, the pivot and the select mode as steps of their own, even when no geometry moves. Tutorials need these: the viewer sees what you picked before you acted.
- 4
Capture Camera MovesDefault: On
Record orbiting, panning and zooming as steps. Without it nothing is recorded until the first mesh edit, and the camera work you do while explaining is lost.
- 5
Capture ModifiersDefault: On
Record each object's modifier stack, its order and settings, at every step, so a Mirror or Bevel added mid-session shows up in the replay.
- 6
Show KeystrokesDefault: On
Draw the keys you press at the bottom of the viewport: live while recording, and per step during playback and export.
- 7
+ MouseDefault: Off
Also log mouse clicks. Noisier.
- 8
Key SizeDefault: Small
Size of the keystroke text.
- Small
- Subtle, for normal screens
- Medium
- Larger
- Large
- For high-resolution recording
- 9
Memory Limit (MB)Default: 2048
Stop recording when the session holds this much memory. Blender does not survive running out of memory and the unsaved file goes with it, so this trades a stopped take for a lost file. 0 means no limit.
- 10
Follow NewestDefault: On
Keep the playhead on the newest step while recording.
- 11
Edition and build
Which edition and build is installed. Quote it in any bug report.
- 12
Diagnostics
Writes a report on key capture and the recorded steps to a text block, for troubleshooting.
Playback
FreeProAppears once something is recorded. Review the take, and set how it plays: the export follows the same Hold and View. If you scrub while an object is in Edit Mode with Show Edit Mode off, a warning asks for Object Mode.
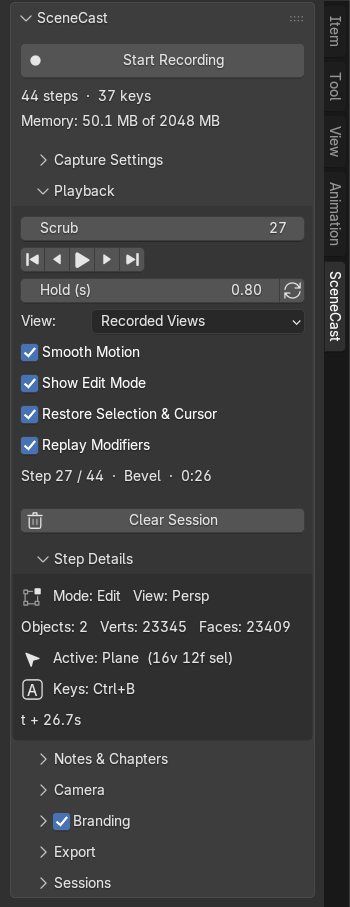
- 1
Scrub
Drag to move through the session; the number is the step, counted from 1. The model, the view, the selection and the modifiers change to match each step.
- 2
Transport
First step, previous step, play/pause, next step, last step. Play advances through the steps with the camera gliding between them.
- 3
Hold (s)Default: 0.80
How long each step stays on screen. Export uses the same value, so a video runs at the speed you reviewed it.
- 4
LoopDefault: Off
Start again from the first step when playback reaches the end.
- 5
ViewDefault: Recorded Views
Where the camera sits during playback and export.
- Current View
- Leave the viewport exactly as it is
- Recorded Views
- Replay the camera as it was while recording
- Front / Right / Top
- A fixed orthographic view, framed on the finished model
- Scene Camera
- Look through the scene's active camera
- 6
Smooth MotionDefault: On
Glide the geometry and the camera between steps instead of snapping. Only does anything with Recorded Views, so it greys out otherwise.
- 7
Show Edit ModeDefault: Off
Replay steps recorded in Edit Mode with the edit cage visible. It enters and leaves Edit Mode as it plays, which adds entries to Blender's undo history.
- 8
Restore Selection & CursorDefault: On
Put back each step's selection, 3D cursor and pivot while you review. This changes your live selection.
- 9
Replay ModifiersDefault: On
Rebuild each step's recorded modifier stack on the object while scrubbing and exporting. This changes the live object's stack.
- 10
Step summary
The step under the playhead, the tool that made its change, and how far into the session it is (minutes:seconds).
- 11
Clear Session
Discard every recorded step. It asks first. Objects hidden by the replay are shown again and go back to their own collections.
- 12
Step Details
Folded by default. Mode and view, object/vertex/face counts, the active object and how much of it is selected, its modifiers, the keys pressed and the time since the session started.
Notes & Chapters
ProText on the video: notes as captions or pinned to a point in the scene, chapters as title cards. Notes show in the viewport while you scrub, exactly as they will export.
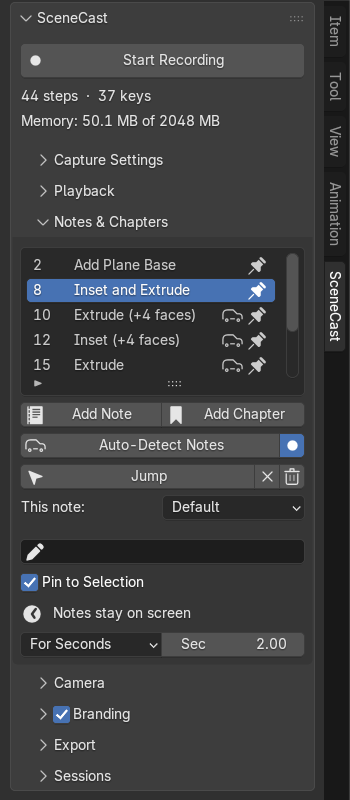
- 1
Notes list
Every note and chapter, in session order: the step it sits on, its text (click to rename), then icons. A bookmark marks a chapter; the car marks a note Auto-Detect wrote; the pin marks a note pointing at a place in the scene; a clock marks one with its own timing.
- 2
Add Note
Add a note at the playhead, or at the newest step while recording. Its text comes from the field below; empty, it says “Note”.
- 3
Add Chapter
Add a chapter: a large title card in the video that starts a section. Chapters are never pinned to a spot.
- 4
Auto-Detect Notes
Write a note for each action in the session, such as “Inset (+8 faces)” or “Add Mirror modifier”, pinned where it happened. It replaces earlier automatic notes. Notes you wrote, or automatic ones you reworded, stay, and the steps right beside them get no automatic note.
- 5
Auto-detect on stopDefault: On
Run Auto-Detect by itself whenever a recording stops.
- 6
Jump
Move the playhead to the selected note's step.
- 7
Remove
Delete the selected note.
- 8
Clear all
Delete every note and chapter.
- 9
This note
How long the selected note stays on screen. Default follows the setting at the bottom of the panel.
- Until Next
- Until the next note or chapter replaces it
- For Seconds
- Gone after a set time, or sooner if a newer note arrives
- Keep
- Stays to the end; newer notes stack above it
- 10
Note text
Type the text for the next note or chapter, then press Add Note or Add Chapter.
- 11
Pin to SelectionDefault: On
New notes point at what is selected: the selected vertices, else the active object, else the 3D cursor. They are drawn beside that point with a leader line. Off, they sit in the caption bar.
- 12
Notes stay on screenDefault: Until Next Note
The default timing for every note that does not set its own. For Seconds shows a seconds field beside it.
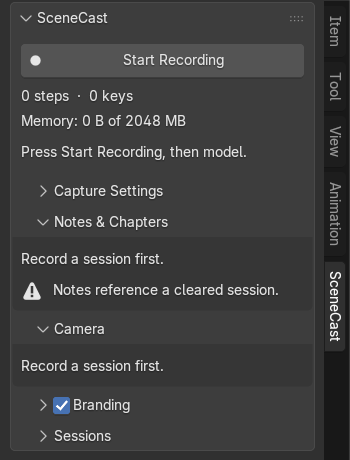
- 1
Waiting for a take
Notes and camera keys belong to steps, so these sections stay empty until there is a session.
- 2
Left-over notes
Notes are saved in the .blend and a session is not, so clearing a take or reopening the file without its session leaves notes behind. The panel says so; load the session in Sessions, or clear the notes.
Camera
ProTwo ways to direct the shot, applied in this order: Director Camera replaces the recorded angles with your own keys, then Punch In tightens whatever that frames onto the part being worked on.
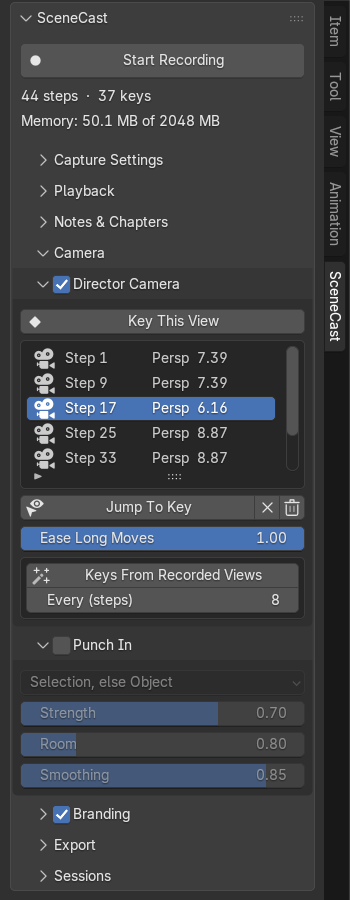
- 1
Director Camera switchDefault: Off
Play back and export through your own camera keys instead of the recorded angles. It can only be switched on once there is at least one key.
- 2
Key This View
Store the current viewport angle as a camera key on the step under the playhead. Keying a step that already has a key updates it.
- 3
Camera keys
One row per key: the step, perspective or orthographic, and the view distance. Keys are tied to steps, so changing Hold or the frame rate re-times the camera with the session.
- 4
Jump To Key
Move the playhead to the selected key and look through it.
- 5
Remove Key
Delete the selected key.
- 6
Clear Keys
Delete every key.
- 7
Ease Long MovesDefault: 1.00
How much to soften the start and end of a camera move. It is applied in proportion to how far the camera travels, so small nudges stay responsive. Greyed while the director is off.
- 8
Keys From Recorded Views
Replace all keys with the angles you were looking from while recording: one key every N steps plus the last step. A starting point to clean up rather than keying every shot by hand.
- 9
Every (steps)Default: 10
The step interval for Keys From Recorded Views.
- 10
Punch In switchDefault: Off
Push the camera in on whatever each step works on, so small edits stay readable at video size. Applies on top of the director, and what you see paused is exactly what exports.
- 11
SubjectDefault: Selection, else Object
What the camera tightens onto.
- Selection, else Object
- The selected vertices, otherwise the whole active object
- Selection Only
- The selected vertices; no punch-in when nothing is selected
- Active Object
- Always the whole object
- 12
StrengthDefault: 0.70
How far toward the tight framing to go. 0 leaves the view alone, 1 goes all the way in.
- 13
RoomDefault: 0.80
Space left around the subject. Low values crop tight; raise it to keep the surrounding mesh in view.
- 14
SmoothingDefault: 0.85
How many neighbouring steps the framing averages over. High values glide between subjects; 0 cuts to each one.
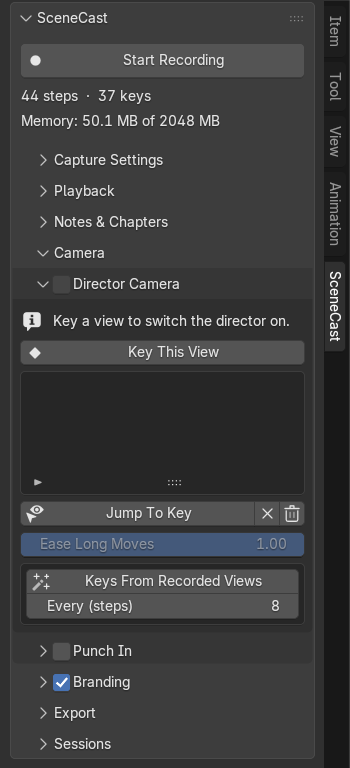
- 1
Switch waits for a key
With no keys the checkbox is unavailable, because there is nothing to direct.
- 2
Hint
Says what to do: key a view. Key This View and the rest of the panel work straight away.
Branding
ProA title card before the session, an end card after it, and a watermark over it. Sizes are shares of the video's height, so a vertical export and a 4K one look alike.
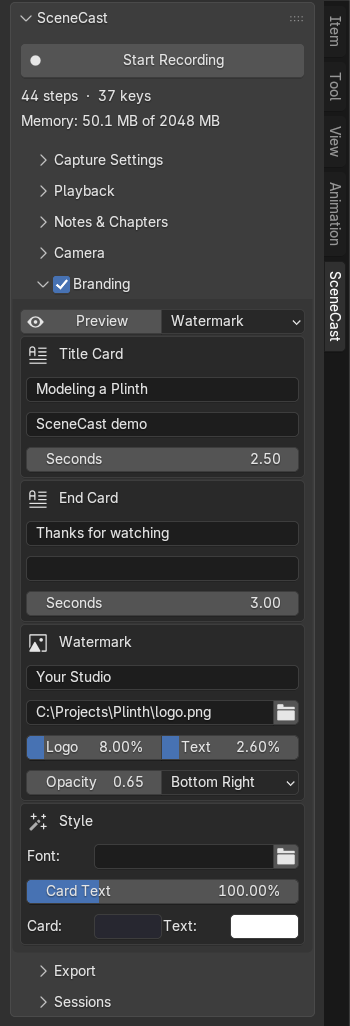
- 1
Branding switchDefault: Off
Add the title card, end card and watermark to the exported video. Off, nothing here is rendered and the settings grey out.
- 2
PreviewDefault: Off
Show the branding over the viewport, in a frame the shape of the export and at the size it will be in the video.
- 3
Preview what
Which part to preview: the watermark, the title card or the end card.
- 4
Title
Title card text, shown before the session. Empty means no title card.
- 5
Subtitle
A smaller line under the title.
- 6
SecondsDefault: 2.50
How long the title card shows.
- 7
End Card
End card text, shown after the session. Empty means no end card.
- 8
Subtitle
A smaller line under the end card text.
- 9
SecondsDefault: 3.00
How long the end card shows.
- 10
Watermark text
A line of text held in a corner for the whole video.
- 11
Logo
An image held in the corner for the whole video. A PNG with transparency works best.
- 12
Logo sizeDefault: 8%
Logo height as a share of the video's height, so it looks the same at every resolution.
- 13
Text sizeDefault: 2.6%
Watermark text height as a share of the video's height.
- 14
OpacityDefault: 0.65
How solid the watermark is.
- 15
CornerDefault: Bottom Right
Bottom Left, Bottom Right, Top Left or Top Right.
- 16
Font
A font file for the cards and the watermark. Empty uses Blender's interface font.
- 17
Card TextDefault: 100%
Size of the title and end card text.
- 18
Card colour
Background of the title and end cards.
- 19
Text colour
Colour of the card and watermark text.
Export
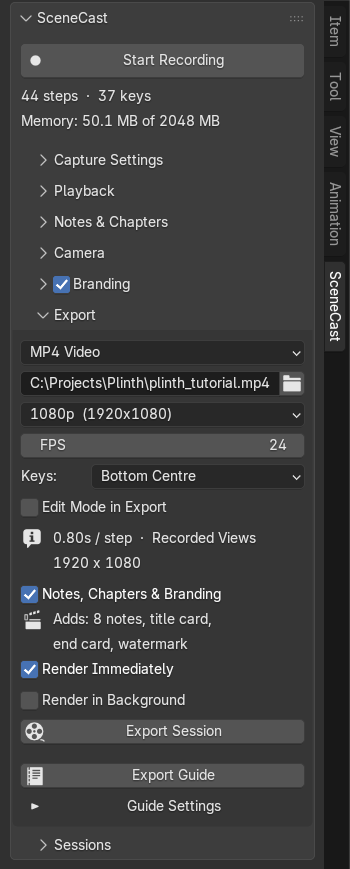
FreeProAppears once something is recorded. One button makes the video. The free edition exports the session with its keystrokes; Pro adds notes, chapters, branding, rendering in the background and the written guide, all from the same box.
Free
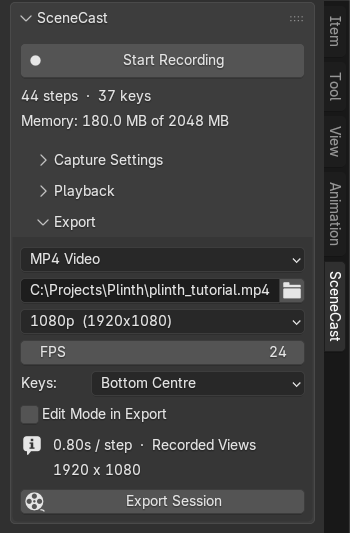
- 1
FormatDefault: MP4 Video
MP4 Video, a single H.264 file, or PNG Sequence, numbered frames in a folder.
- 2
OutputDefault: //scenecast_session.mp4
MP4: the file to write. PNG: the folder for the frames. On a file that has never been saved, exports go to Documents\SceneCast and a note under the field says so.
- 3
ResolutionDefault: 1080p
The output size, independent of the scene's render settings.
- 720p, 1080p, 1440p, 4K
- Landscape 16:9
- Vertical (1080x1920)
- 9:16 for Shorts, Reels and TikTok
- Square (1080x1080)
- 1:1 for feed posts
- Custom
- Shows W and H fields
- Scene Settings
- Use Output Properties
- 4
FPSDefault: 24
Frames per second of the video. Each step lasts Hold × FPS frames.
- 5
KeysDefault: Bottom Centre
Where keystrokes appear in the video. Unavailable when Show Keystrokes is off.
- Bottom Centre
- Like the viewport; renders the frames, then adds the text (two passes)
- Top Left (fast)
- Burnt in during the render; one pass, but Blender fixes the position
- Off
- No keystrokes in the video
- 6
Edit Mode in ExportDefault: Off
Experimental. Show the edit cage in the video for steps recorded in Edit Mode. Needs Show Edit Mode in Playback.
- 7
Summary
Hold per step and the view, then the size in pixels the export will use. Hold and View are set in Playback.
- 8
Export Session
Render the session. Blender is busy until it finishes; the viewport is driven frame by frame.
Pro additions
- 1
Notes, Chapters & BrandingDefault: On
Export with your chapters, notes, keystrokes, title card, end card and watermark. Off exports the plain session video. Needs MP4.
- 2
Adds
What this export will add. With nothing to add it says so and exports the plain video.
- 3
Render ImmediatelyDefault: On
Render the video now. Off only builds the “SceneCast Edit” sequencer scene, so you can adjust the text strips and render it yourself.
- 4
Render in BackgroundDefault: Off
Hand the export to a second Blender that opens minimised, so you can keep working. It makes the same video Export Session makes. Save the .blend first: the second Blender reads it from disk.
- 5
Export Session
Runs the export: the plain one, the annotated one, or the background render when it is switched on.
- 6
Export Guide
Write the session as a written tutorial: a still per entry with its notes, keys and tool, saved next to the video.
- 7
Guide Settings
Click to unfold the guide's settings.
Rendering in the background, and the guide
- 1
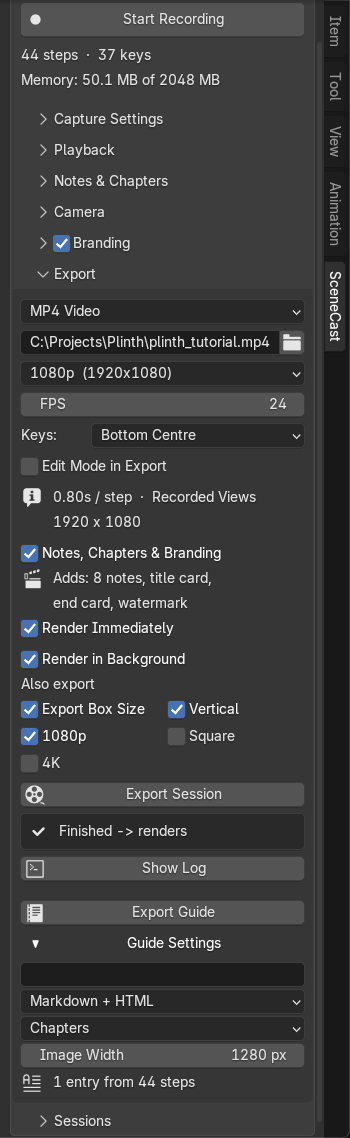
Also export
The sizes to render. Export Box Size is the Resolution above, written to the Output path. Each extra size goes beside it as name_1080p.mp4, name_4k.mp4, name_vertical.mp4, name_square.mp4. A size already chosen above is rendered once.
- 2
Job status
While a background render runs: how many sizes and how long so far. Afterwards: finished, or failed with its exit code.
- 3
Show Log
Load the background render's log into a text block, to see why a render failed.
- 4
Title
The guide's heading. Empty uses “SceneCast Session”.
- 5
FormatDefault: Markdown + HTML
Markdown, a standalone HTML page, or both.
- 6
IncludeDefault: Chapters
Which steps become entries. The last step is always included.
- Chapters
- One entry per chapter
- Chapters + Notes
- One entry per annotated step
- Every N Steps
- Regular intervals; shows an Every field
- Every Step
- One entry per recorded step (long)
- 7
Image WidthDefault: 1280 px
Width of each still; the height follows the export's shape.
- 8
Entry count
How many entries the guide will have with these settings.
Sessions
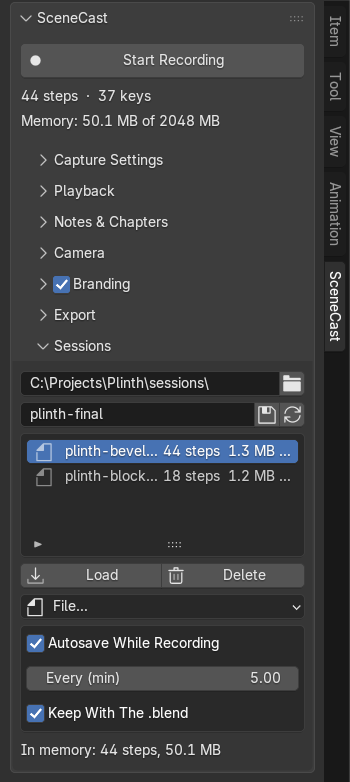
ProA recorded session lives in memory and is gone when Blender closes. Sessions keeps it: a library of saved takes, autosave while recording, and saving alongside the .blend.
- 1
Library folderDefault: //scenecast_sessions/
Where saved sessions are kept.
- 2
Save As
File name for the next save. Empty uses the .blend's name.
- 3
Save To Library
Write the current session into the library folder.
- 4
Refresh
Re-read the library folder.
- 5
Library
Every .scast file in the folder, with its step count and size, read without loading the geometry.
- 6
Load
Replace the session in memory with the selected file.
- 7
Delete
Delete the selected file from disk. This cannot be undone.
- 8
File…
Save Session As and Load Session File open a file browser, for a session file anywhere on disk. Compact Memory shares duplicate snapshots in memory, which is lossless.
- 9
Autosave While RecordingDefault: On
Write the session to the library at intervals while you record, so a crash costs minutes instead of the whole take. A failure shows here in red.
- 10
Every (min)Default: 5.00
How often autosave writes.
- 11
Keep With The .blendDefault: On
Save the session beside the .blend when you save the file, and load it again when you reopen it.
- 12
In memory
The session's size in memory, the same figure as the status line.
In the viewport
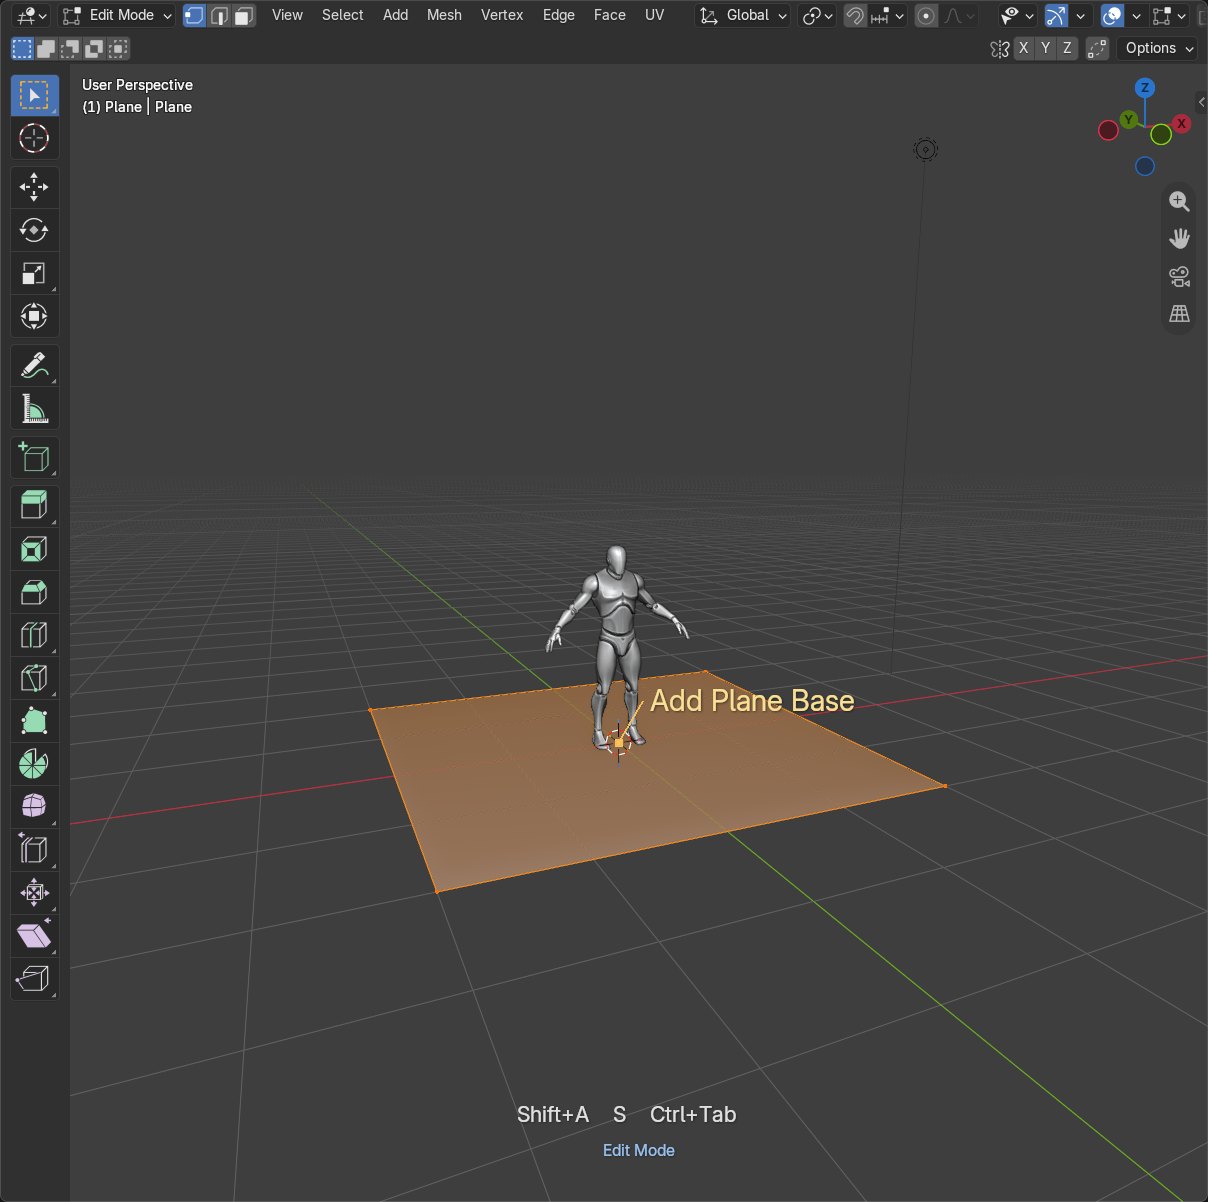
FreeProWhat playback draws over the scene. Export puts the same text in the same place in the video.
- 1
Keystrokes
The keys pressed for this step. They are drawn during playback and burnt into the exported video at the same place.
- 2
Operator
The tool that made this step's change, in blue.
- 3
Pinned note
A note pinned to a point is drawn beside it, with a leader line and a dot on the point. It follows the point as the camera moves.
Labels and defaults are taken from the add-on's own code for this build. Blender scales the sidebar with its interface size, so on your screen the panel may be wider or narrower; the order and the controls are the same.